Mobile phone? Go to my Adobe portfolio page!
This site is not optimized for viewing on a mobile phone

Every device has its own ‘color space’; the description of the colors that particular device can reproduce. Devices which work with colored light, such as computer monitors and digital cameras, are well capable of reproducing bright and radiant colors, especially in the primary RGB colors (red, green and blue). Their color space is large in those areas. Highly saturated yellow is more difficult for such devices, so their color space is smaller in that area. For printers, the situation is reversed. Because a printer works with CMYK based color inks (yellow, magenta, cyan, black), it can reproduce those colors very well. But to reproduce a bright red or green color, a printer would have to mix two inks and at the same time use very little ink (to keep the brightness). That is difficult and so the printer color space in that area is relatively small. What color management does is compare the different color spaces of different devices, and then change the colors so that they ‘translate’ as well as possible between the different spaces. So using color management does not make a perfect match between your monitor and your printer, but the best possible match. For this we use ‘color profiles’, which are nothing more than the description of the color space they belong to. So the AdobeRGB profile describes the AdobeRGB color space, and ‘MyMonitorProfile’ describes the colors your monitor can reproduce.
Color profiles
To use color management, your monitor should be calibrated and you need to have color profiles of the devices you use. Printer profiles are normally installed with the installation of the printer driver. Sometimes that’s one profile for the printer, but it’s better to have a dedicated profile for each kind of paper that you use. You’ll understand that a certain amount of yellow ink on glossy ‘photo’ paper will look different than the same amount of yellow ink on a matt sheet of paper for a copier. That means that the printer has a different color space per paper. If you do not have paper-specific profiles yet, you can normally download them from the website of the manufacturer.
 Printing with color management
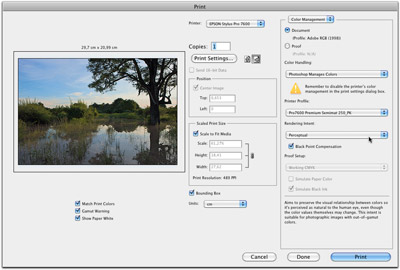
Now we are going to use color management during the printing process. From Photoshop CS4 onwards, you have a preview in the print dialog which shows you a simulation of how the colors will look when printed, if you check the Match Print Colors checkbox. In previous versions of Photoshop the preview is not color managed. In the middle part of the dialog you first choose the pinter (if you have more than one). Now click on Print Settings… to go to the printer preferences. Here you can choose the paper size, paper orientation (that you can also choose in the Photoshop dialog). Below that you can define how large the photo is printed on the paper.
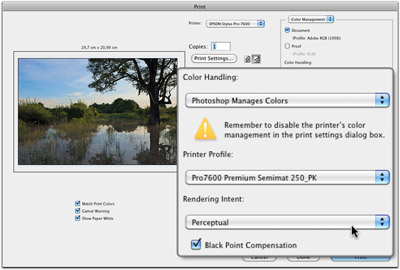 Now go the the right part of the dialog to set color management. Choose Document under Color Management and Photoshop Manages Colors under Color Handling. Under Print Profile you select the printer/paper profile for your particular printer and the paper you are going to use. Choose either ‘Perceptual’ or ‘Relative Colorimetric’ as Rendering Intent.
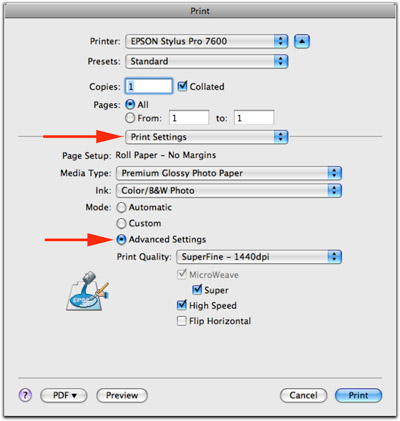 Because you have instructed Photoshop to do the color conversion between the document color space and the printer color space, it’s imperative that the printer driver doesn’t try to do the same one more time! That is where most mistakes are made. In the printer driver you must turn off any form of color adjustment! The steps you need to take are a little different for each brand of printer and for Macintosh versus Windows, but the basic principle is always the same. I show you an Epson printer with MacOS X. Press the Print… button to get to the printer driver dialog. First select the correct paper type (glossy, matt), and then click on Advanced to select the print quality. For this profile, the quality setting needs to be 1440 dpi.
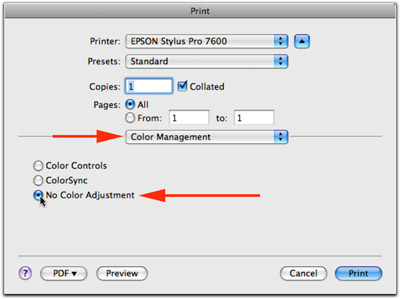 Next go to Color Management and choose No Color Adjustment so that all color adjustment in the printer driver is turned off. Because you always have to do this, you can save these settings as a preset. That’s it! Your print should now closely match what you saw on screen in the preview.
This is the photography blog and website of Dutch photographer and author Johan W. Elzenga. All my images and text are my copyright and may not be used in any way without my prior consent.
360° interior panoramas